Manual
OPERATION
TO CLOSE
To close shade, use the leather tabs to pull the shade from each side of the windshield and fasten it by touching the velcro together at the leather tabs. Fold down visors for best fit. Typically, fastening at the center is all that is needed.
NOTE: If the rearview mirror includes an attached wire that is interfering with easy closure of the shade, adjust the position of the wire to run above and along the post of the rearview mirror (tie down to post if preferable).
TO OPEN
Fold up visors, hold onto the leather pull tabs, separate the velcro, and guide the shade back to the open position.
Be kind to your Eclipse Sun Shade — always guide it back rather than let it snap back.

TO REMOVE/REPLACE
Remove – Hold retractor and firmly move shade up and out of mounting brackets
Replace – Align mounting feet above mounting brackets and slide shade down into secured position
TO CLEAN FABRIC
For spot cleaning. use only a solution of mild detergent (such as Woolite) and water.
TO REINSTALL ON A DIFFERENT WINDSHIELD
Use only new mounting brackets when reinstalling on a different windshield; e.g., replacement of broken windshield. Brackets are not designed to be reused.
SERVICE
Your new Eclipse Sun Shade has been manufactured with a high degree of care and quality control. However, should you have any difficulties with the product, please email us at info@eclipsesunshades.net.
WARNING
Open shade before operating vehicle. Obey all state and/or local regulations relating to the use of windshield sun shades.
Installation
ATTACH ALL MOUNTING CLIPS TO RETRACTOR
(NOTE: INSTALL SHADE AT TEMP OF 50+F)
Attach Mounting Clips
-
SEPARATE SHADE HALVES
-
“SOFT” VELCRO – DRIVER SIDE
-
“FIRM” VELCRO – PASSENGER SIDE
-
-
LEAVE ADHESIVE COVERS IN PLACE
-
CLIP ARROW POINTING DOWN
-
SLIDE FOOT INTO CLIP
-
TOP TO BOTTOM
-
-
FIRMLY PUSH TO FULL ATTACHMENT

Position Shade
A. AT LEAST ½” BELOW TOP TRIM
B. CLIPS/RETRACTORS (CLOSE TO SIDE TRIM BUT NOT TOUCHING)
C. SHADE BOTTOM CLOSE TO DASH (BUT NOT TOUCHING)
D. MARK MOUNTING CLIP POSITION (MASKING TAPE OR MARKING PEN)

Mount Shade
- KEEP CLIPS ATTACHED TO SHADE
- CLEAN GLASS MOUNTING AREA ALCOHOL SWABS PROVIDED
- REMOVE ADHESIVE COVER
- CAREFULLY ALIGN TO POSITIONS
- FIRMLY PUSH CLIPS ON WINDSHIELD
- INSPECT ADHESIVE TAPE BACK SIDE
- VIEW FROM OUTSIDE OF VEHICLE
- PRESS OUT VISIBLE AIR POCKETS
- ALLOW ADHESIVE TO CURE FOR SEVERAL HOURS BEFORE USE

RETRACTOR REPLACEMENT
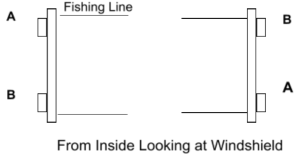
The Retractors have 2 screws attaching the cover to the base. There are 2 orientations -“A” and “B”. From inside the vehicle looking out with a mounted shade, the Retractor orientations are: “A” driver-side upper and passenger-side lower; & “B” -passenger side upper and driver side lower, such as:
RETRACTOR REPLACEMENT:
1. Remove the single mounting screw attaching the Retractor to the plastic rail, save screw.
2. Cut the line near the Velcro, find the line tie-off bead outside of the Velcro and pull cut line through Velcro. Carefully remove bead from the line, save it. Discard old Retractor and line.
3. Double check alignment of the new Retractor ensuring it is the correct version (A or B).
a. Replace the saved mounting screw into the plastic rail with the screw head on the inside of the rail
b. Hold the new Retractor on the outside of the plastic rail aligning the mounting hole near the protruding mounting screw tip. Thread the loose monofilament line into the plastic line hole. Insert the screw, threaded tip into the mounting hole and firmly tighten the screw. Make sure the base of the Retractor is flush against the plastic rail and side guide rails of the Retractor are outside the edges of the plastic rail.
c. Thread the loose line through the guide holes in all the pleated fabric up to the inside of the Velcro connecting strip.
d. Hold the line near the end and carefully thread it through the line hole in the Velcro connecting strip. (If the line hole is blocked push a large needle through to clear obstructions) Once the line is through the Velcro pull it to remove any slack between the Retractor and line end.
e. Firmly hold the line end. Gently, pull it out 3-4” and retract it back to make sure the line is smoothly moving through the Retractor. Repeat several times for confirmation.
f. Thread the saved tie-off bead onto the line. Move the bead to the Velcro and make sure there is no slack in the line between the Velcro and Retractor. Tie a knot in the line against the outside edge of the bead to mark this location.
g. The final step is to pre-tension the Retractor spring. Pull the line out of the Retractor approximately 5” and move the bead to the Velcro. This is the location of the bead for the final tie-off. Loop the line around the bead, tie 4-5 firm cinching knots and trim excess line down to ~ ¼” from the bead. The bead will “nest” into the Velcro.

STEP 1: BRACKETS
Position each mounting bracket under the housing tab, as indicated in Figure 1, and slide onto the bracket all the way to the stop, making sure the directional arrows on brackets are both pointing down as indicated in Figure 1.2.


STEP 2: CLEANING
With glass cleaner and paper towels, thoroughly clean the inside of the windshield next to the posts.
Wipe same area with alcohol pads provided and dry completely with a FRESH paper towel.
NOTE: Do not install at temperatures below 60° F.

STEP 3: POSITIONING
Hold the shade next to the windshield post (do not remove adhesive liners yet). The angle cut should be at the bottom with the velcro toward the center, as illustrated in Figure 3.
Position the shade at least 1/2″ from the upper trim with the bottom of the shade close to the dashboard but NOT TOUCHING.
The plastic housing should be close to the windshield post
but NOT TOUCHING.


STEP 4: PEELING
Peel the protective liners from the adhesive.
STEP 5: ATTACHING
Position shade as instructed in Step 3 and gently touch adhesive pads to windshield.
Apply light, steady pressure to each housing, as indicated in Figure 5.


STEP 6: PRESSING
Remove shade as shown on reverse-side of this sheet. Step outside of vehicle and press on each adhesive pad so that there is a minimal amount of air trapped between glass and adhesive. Repeat steps 1-6 for other shade half.
NOTE: Before replacing the shade in mounting brackets, allow 24 hours curing time for adhesive pads to reach full bond strength.
CAUTION: After Installing, be careful not to spray cleaning solutions (such as Windex) directly on the mounting brackets as this will weaken the adhesive bond.
ONE YEAR LIMITED WARRANTY
The Eclipse Sun Shade is warranted to be free from material and workmanship defects for one year. S4 Partnership will repair or replace, at its option. a defective unit when the unit is delivered prepaid to S4 Partnership or to its authorized service representative.
This warranty not apply to damage to the product not resulting from defects in material to workmanship. S4 Partnership gives other warranties, expressed or implied. including warranty of merchantability, fitness for a particular use, or design.
