FAQ
Installation
Your Title Goes Here
Your content goes here. Edit or remove this text inline or in the module Content settings. You can also style every aspect of this content in the module Design settings and even apply custom CSS to this text in the module Advanced settings.
Installation Instructions
Read the installation manual by clicking here.
Retractor Replacement
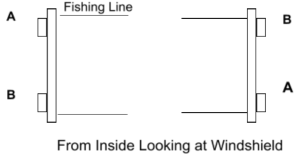
The Retractors have 2 screws attaching the cover to the base. There are 2 orientations -“A” and “B”. From inside the vehicle looking out with a mounted shade, the Retractor orientations are: “A” driver-side upper and passenger-side lower; & “B” -passenger side upper and driver side lower, such as:
RETRACTOR REPLACEMENT:
1. Remove the single mounting screw attaching the Retractor to the plastic rail, save screw.
2. Cut the line near the Velcro, find the line tie-off bead outside of the Velcro and pull cut line through Velcro. Carefully remove bead from the line, save it. Discard old Retractor and line.
3. Double check alignment of the new Retractor ensuring it is the correct version (A or B).
a. Replace the saved mounting screw into the plastic rail with the screw head on the inside of the rail
b. Hold the new Retractor on the outside of the plastic rail aligning the mounting hole near the protruding mounting screw tip. Thread the loose monofilament line into the plastic line hole. Insert the screw, threaded tip into the mounting hole and firmly tighten the screw. Make sure the base of the Retractor is flush against the plastic rail and side guide rails of the Retractor are outside the edges of the plastic rail.
c. Thread the loose line through the guide holes in all the pleated fabric up to the inside of the Velcro connecting strip.
d. Hold the line near the end and carefully thread it through the line hole in the Velcro connecting strip. (If the line hole is blocked push a large needle through to clear obstructions) Once the line is through the Velcro pull it to remove any slack between the Retractor and line end.
e. Firmly hold the line end. Gently, pull it out 3-4” and retract it back to make sure the line is smoothly moving through the Retractor. Repeat several times for confirmation.
f. Thread the saved tie-off bead onto the line. Move the bead to the Velcro and make sure there is no slack in the line between the Velcro and Retractor. Tie a knot in the line against the outside edge of the bead to mark this location.
g. The final step is to pre-tension the Retractor spring. Pull the line out of the Retractor approximately 5” and move the bead to the Velcro. This is the location of the bead for the final tie-off. Loop the line around the bead, tie 4-5 firm cinching knots and trim excess line down to ~ ¼” from the bead. The bead will “nest” into the Velcro.
Product Questions
Your Title Goes Here
Your content goes here. Edit or remove this text inline or in the module Content settings. You can also style every aspect of this content in the module Design settings and even apply custom CSS to this text in the module Advanced settings.
Do eclipse sunshades come with mounting clips or do I have to buy them separately
Eclipse Sunshades include everything you will need for a successful installation, including adhesive mounting clips, the shade, and installation instructions.
Does my rear-view mirror have a sensor
Any rear-view mirror equipped with a piece of extra technology has a sensor. Whether the mirror is fitted with a compass, detects rain, or has a lane sensor, the shade will need to have a cutout to fit properly.
If my vehicle doesn't have a rearview mirror sensor, but my rearview mirror is mounted on the windshield do I need a cutout
Yes, a 5″ (small) cutout will work well.
